Showing posts with label trap out. Show all posts

Thursday, July 12, 2018

Trap Out!

It was time.

I have been putting off the job at the Vicksburg Auditorium for a while.  Partly because of the nature of the job.  Partly because the removal from the other side of the building (yeah, they had TWO hives) had not gone as I wanted it to (the bees moved inside the building, and made a mess, in a lot of ways).  And partly because of the height of the work, combined with a shaky ladder and NO place to grab hold.  

The job, as before, requires me to remove the bees.  From the inside of the auditorium, there is no way to get to the bees - no opening and no access to the interior of the wall.  From the outside, there was also no way to get to the bees - it is solid brick with a small hole.  But the bees need to be gone.  The city has planned a renovation job on the building next month that will put people in contact with the bees, and it is necessary to get the bees out before they begin.  

And so while I did other jobs in the area, I pondered the proper way to approach this job was.  I read.  I asked.  I talked it through.  And finally it was time.  I could not wait any longer to get started.

The idea behind a trap-out is to get the bees out of a wall that you cannot access any other way.  Part 1 of the trap-out is to create a one-way door so that the bees can leave, but not return.  The bees leave the hive to forage, and then can't get back in, and start looking for somewhere to be.  They end up congregating in the closest available space. 

That is where Part 2 comes in.  In Part 2, the beekeeper places a box nearby that the escaped bees can use as a new home.  Make it attractive, make it nice, and you can eventually evict all the bees from their current home, and they will be in the new mobile apartment that you can then move to a safe location (like my backyard).

There are some problems.  Problem #1:  The queen does not like to come out.  This is a big problem, because the queen lays a LOT of eggs every day.  She lays up to 2,000 eggs every day, which means that within the next few weeks, there are up to 42,000 bees in process.  As many as you draw out of the hive, she is going to replace them just as fast.  So the process can take a while.

Eventually, the nurse bees run through all of their honey stores, and they, as their predecessors did, leave to forage.  The queen only remains inside, unwilling to leave.

Problem #2: without the queen, the workers will bring honey and pollen into their new 'apartment', but they won't lay eggs.  You need a queen for that.  So the only way to proceed is to give the inhabitants of the new apartment what they need.  

To take care of problem #2, I opened a hive at the house and pulled out two frames.  One of the frames had eggs, larvae and capped brood, as well as a queen cell (the bees had prepared a queen, just in case).  The other frame had honey.  I put both frames in a 'nuc box' with three empty frames to give the new inmates neighbors a 'partially furnished apartment' - a little bit of a head start on increasing numbers.  And the right smell.

Now all I had to do was to install the art project.
Step 1.  Anchor the box.  Kathe and I had discussed it together, and ended up deciding that the best approach to anchoring a box to a flat brick wall was to throw an escape ladder over the top of the wall, and attach it to that.  So I put the 75-foot aluminum stepladder against the wall, and started the climb, with each aluminum step compressing below me precariously.  At the top, I grabbed on to the top of the wall and held on for dear life, while I tried to 'maneuver' the escape ladder into place without sending the 'man-over'.

Following the successful installation of the ladder, I climbed back down to get the next piece of the puzzle - the straps.  Because I am planning to leave these in place for a couple of months, I used tie-down straps to anchor the box to the ladder. I climbed back up, and attached them - with only one precarious wobble in the process.  That wobble did it - at that exact moment, I made a decision, and stated it out loud for nobody to hear.

"If anything starts to slip, I am letting it fall.  It is all replaceable.  NO heroic saves."  

Step 2.  Next, I needed to place the box in the strap loops. The box, while not heavy, was a little awkward and not well centered, and climbing the ladder with it was a challenge.  But with slow, steady motions, I got in place, grabbed the top rung of the ladder with an elbowlock deathgrip and tried to slide the straps over the box.  I got them in place, but they were loose, and I started to cinch them up.  

First one side.

Then the other. 

Then back again.

One of the straps overlapped, and I was about to get caught in a bind, so I switched hands and....

26 feet, end over end tumble.

No heroic saves.

Before I descended the ladder (no point in rushing) I adjusted the straps.  My wife suggested that she could go and get me some duct tape (why don't I have duct tape?) and drove off as soon as I was safely on the ground.  I picked up the pieces of the box and frames and put them back together.

Honey everywhere.  I can't tell how badly the brood are damaged, but I suspect none of them will remain viable.  And the box itself is a mess.

But duct tape fixes everything, so humpty dumpty got patched and taken back to the top of the ladder, where he was reattached to the escape ladder.  As I started to descend, I realized that the hole was facing the wrong way - away from the opening.

Ah, well.  The bees will find the opening or they won't.

I then moved to the final step.  Setting the trap.  

The idea for the trap is that the bees will come out of a cone over the entrance, but will not find their way back in.  And if there are two cones, one over top of the other, it will be twice as unlikely that they will find their way back in.  So I sealed up the entire hole, with one opening left open, with expanding foam sealer. Once complete, I set the smaller of the cones, made of screen wire, over the entrance and held it in place for the sealer to set. 

Then repeated for the outer cone, made of 18" hardware cloth.

The process took forever, during which time I was on the top of the ladder, surrounded by (surprisingly passive) bees, clad in multiple layers of a bee suit on a hot July day at noon.

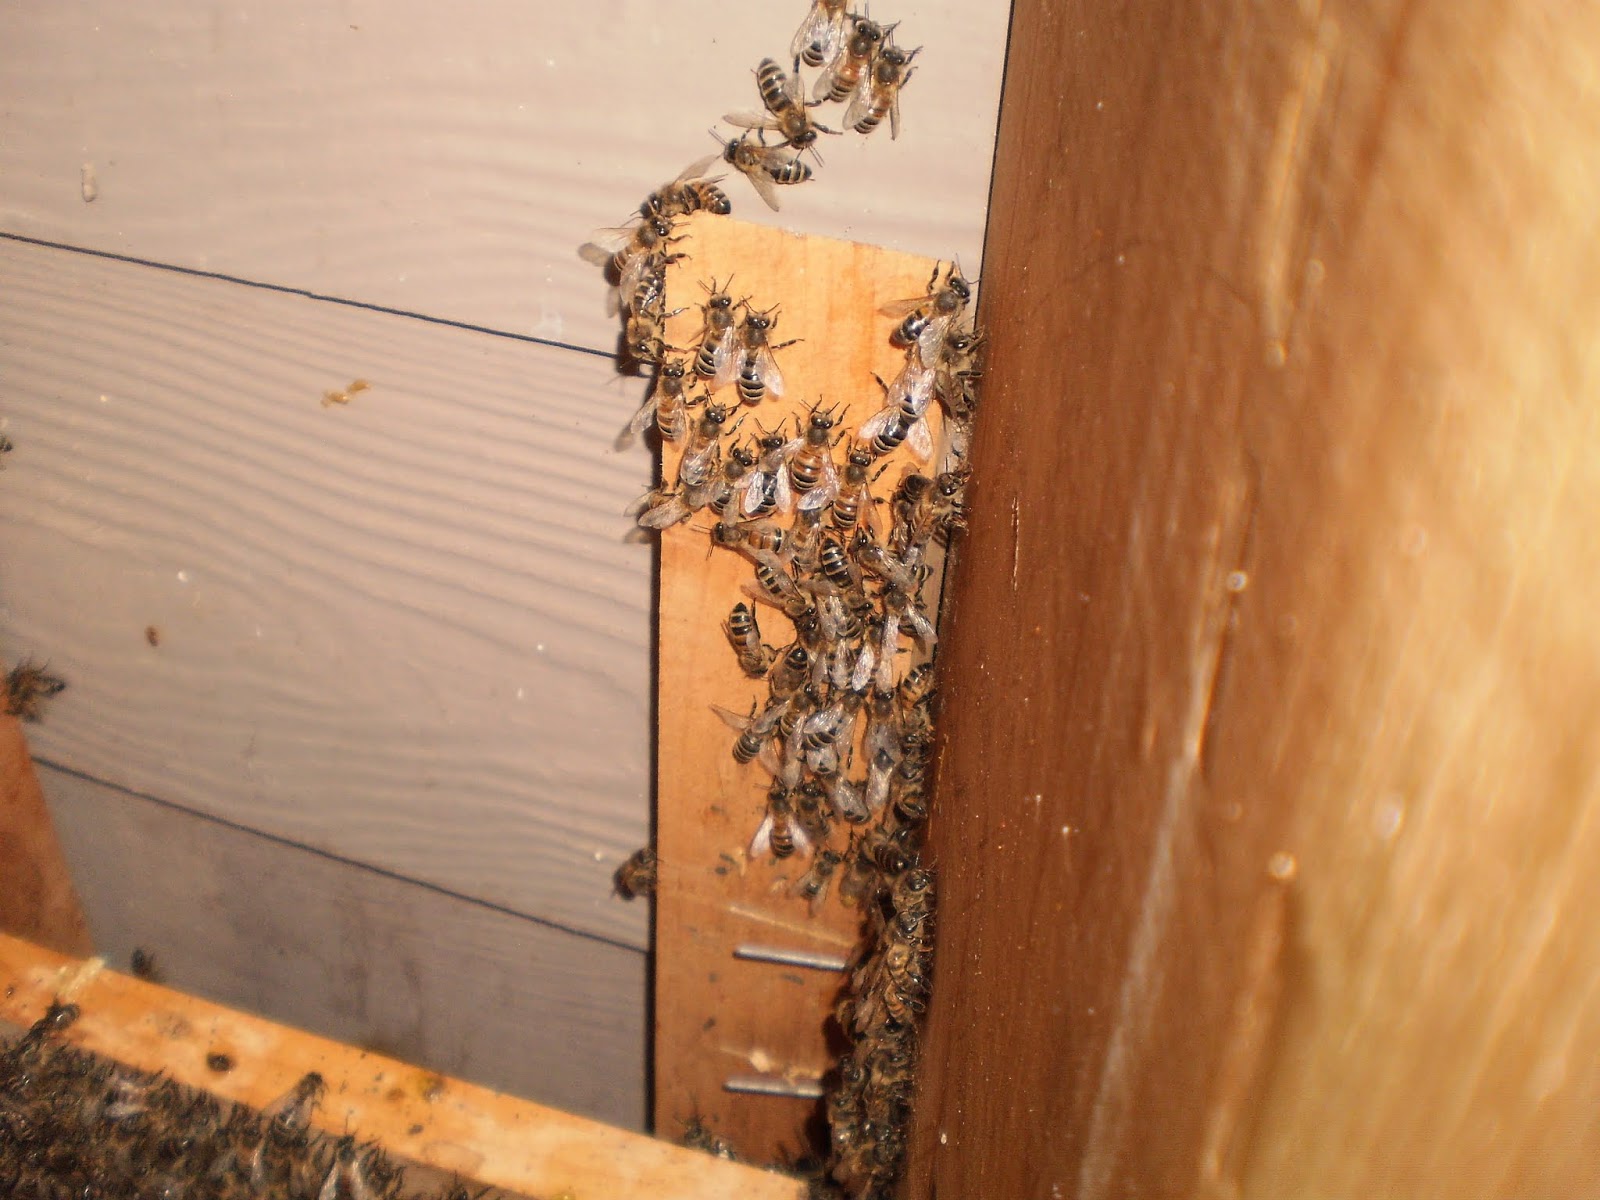
When I released the cone, and it stayed in place, I hopped down the ladder and stepped back to observe.  The bees were emerging, and congregating around the entrance.  But it is too soon to see if they are able to get back in.  I will have to check back pretty regularly to see what is happening.

**Update 8 July - I have been monitoring the bees for the past few days, and there does not seem to be any activity on the new apartment.  And more importantly, perhaps, there does not seem to be a large cluster of bees on the exterior of the cone.  I suspect that they have figured a way around the cone, and I will need to re-seal.

When I do (scheduled for Thursday), I will see if I can't take more pics.  And I will replace the box.


Sunday, July 1, 2018

Cone Trap - Brushy Mountain Part 2

Regardless of how you got here, whether you simply waited or you used some interim measure to try it first, the time finally comes to apply the cone you bought from Brushy Mountain Bee Farms.  And it works.

The bees are able to get out, but not get back in.  The escaped bees look for a new home, and find one in your hive, hung next to the entrance on the escape ladder, carefully draped and secured over the top of the wall, 35' above the concrete.

For some of you who got here after doing other things, you removed the multiple attempts at sealing off the holes and attached the cone.  For those who came straight here, you sealed up the other entrances with expanding foam sealer and attached the cone.

Either way, the cone directs the bees out of the hive, and does not let them back in.


The result is very exciting.


Bees out and about.... and not going back in.  A couple of adjustments a couple of days later, and the box is close enough to draw the bees into the space that smells like bees.  Once the bees have started to see it as a home, you take a couple of frames of brood stolen from one of your backyard hives, and place them in the box.  And then you wait.

For two weeks you wait, leaving the whole setup alone. Of course, you check it out every other day, just to make sure that the seals hold.

Two weeks later, you take the box down, and open it up.

Inside, you see this:

In the two weeks since you put two frames of eggs and brood in the box, the bees inside have taken three of those eggs and made them into queen cells, fed the larvae, closed her up to let her pupate, and then waited.  And she emerged!

You look carefully through the five frames to see if you can could find her (virgin queens are harder to spot) or if she was laying yet. No eggs.  Someone who might be a queen....  but not sure.

Either way, she is there.

And...

She has already started taking care of business.

One hive, One queen.  Inviolate rule.  So, since the bees in the box raised THREE queens, her first job is to eliminate rivals.  She emerged first, and then quickly ran over to the other two, chewed an opening into their pupa cells, and stung them to death.

Ruthless. But effective.

The workers then pulled the carcasses of the dead queen bees out and discarded them, leaving behind a ragged shell of what originally housed royalty.

You are pretty sure that you arrived on day 17 of the queen's life, after she emerged, and before her mating flight.  There were no eggs or brood in the hive.  But you now have a hive with a viable queen.

Partial success to your mission of removing the bees!

Meanwhile, more bees continue to emerge from the auditorium, and they seem to find their way into the box.  At this point, however, you are trying to figure out whether to try another box to capture the remainder of the bees.  After all, the bees emerging from the hive in the wall are not welcome in the new queendom...

Huge success here.  You should be proud of yourself.  And please, help yourself to a little celebration for your success: a cocktail that truly fits the bill: the bees knees.

Bee's Knees


Taking the Job

"Mr. Lawton?"

"No, ma'am.  That was my dad.  I am just Crorey."

"Oh."

Not an unusual start to a conversation - it usually starts this way.  After introductions, get down to the business of signing contracts, and walk out with a contract for $200 per hive removal.  Discounted because the city is letting you use their ladder.  The height is a little intimidating, but is OK, because you just signed with the city to do work.

One side of the building has a hive - and the hive is next to a tree.  The other side of the building has another hive, and there is nothing there to hang on to - but also nothing to get in your way.  Both of them need to be removed, and need to be removed safely.  For neither of them can you actually tear open the wall.

Your first decision is which side of the building to address first.  Since you are new at this, you pick the one where there is something to grab onto.  It means that there is a little bit of wiggling that you have to do to get to the top, but once you are there, there are sturdy branches to brace yourself against.

The second decision is more important.  How do you coax the bees out?

Your equipment is limited.  You have a vacuum that has been modified to pull bees out, and a bucket that the bees get drawn into (a better design by Dr. Scott Johnson is detailed here).  And you have the traditional smoker and suit.  And finally, you have sealer - a can of expanding foam that will allow you to seal the other entrances, and ensure that you catch the whole hive.  The final ingredient that you have is:

...a fair amount of chutspah.

....and urgency.  There are a number of events planned for the auditorium, and the city wants the participants of each to have a bee-free event.

Two ways to proceed:  Do you:

a) Set up the ladder and the vacuum and get started?  Click here.

or

b) Go back to the house and read more about trapping out bees.  Click here.


Vacuuming the Bees

You meet with the person in charge of the auditorium, and are immediately put at ease by his easygoing demeanor and easy smile.  After showing you how to find the ladder, Mr. Artiss opens the door to let you hook up the vacuum.  You have coordinated with a co-worker to meet you and hold the ladder - Lee Robinson is fearless, and ends up being a perfect choice.

Hook up the vacuum to the bucket, with the mesh bag inside the bucket to catch the bees, hook up the other hose to the lid, and cinch the shopvac tight against the 7' ladder, and you are ready to go. You started at dusk, when most of the bees would be returning from the field.

I don't know if you know this, but you are VERY much afraid of heights.  And the 30' ladder provided by the City of Vicksburg is pretty rickety. But in the face of such predicaments, you forge ahead.  Because you have chutzpah.

Lee holds onto the ladder, which is wedged between the tree and the building.  And you begin the climb, squeezing between limbs and the brick wall, up three stories.  After tying off the bucket to the ladder, as high as it will reach, you grasp the hose, and give the signal to Lee, who turns on the vacuum.

And the bees begin to disappear down the gullet of the bee vac, making a satisfying sound as each gets sucked backwards.  (Your hose, however, creates a harmonic, resulting in a band-saw like scream that is painful on the ears.  Note to self: the next time you do this, you should probably bring some headphones).

After five satisfying minutes of watching bees get sucked into the machine, you realize you are leaning further and further in towards the entrance to the hive.

Oh, no.  Your vacuum doesn't suck.  Or, depending on your perspective, it does.

So you descend the ladder, carrying the bucket of bees to the ground.  And you transfer them to the spare bucket, an act that makes Lee hightail it away from your spot, as the bees emerge QUITE unhappy with you as a result of their journey.

Now that the bucket is cleared of bees, you ascend, and discover that the vacuum still sucks.  Or, rather, that it does not suck.

Darkness is coming.  You do not have illumination.  What do you do?

Keep working.  The hole won't change its location, so you can easily use your now-failing vacuum to not suck up angry bees in the dark while on top of a 30' ladder.  Click here.

Seal up all holes except for the one you are drawing from, and plan to try again tomorrow. Click here.


Tie-Down Straps to Secure the Box

Great Idea.  Tie-Down Straps give a tight, secure connection that are easy to use, and will not deteriorate or be affected by wind or weather.  They can be cinched down as tightly as needed.  They are sturdy.

The only problem is making the attachment. You are taking the box up a rickety 30' ladder, to attach to what is essentially a rope ladder slung over the top of the building.  To connect the box to the ladder, you will have to do the following steps:

  • Carry the box and the straps up the ladder
  • Balance the box while you attach the straps
  • Extend the box out into the space you want it
  • Hook the strap around the far side of the rope ladder
  • Slide the box through the strap
  • Hook the strap around the near side of the rope ladder
  • Slide the box through the strap
  • Cinch the far strap tight while holding on to the near side
  • Cinch the near strap tight 
  • Alternate between the two straps until the box is secure
Now, at the end of every step above, add the words, "and do not fall."

Two decisions were made early on.  1st was, that if you felt the box begin to lose balance, that there would be NO attempt to save it.  Because the words, DO NOT FALL were added to the end of every sentence.  Easier even to replace brood and eggs than a femur.  Or a spine.  Or parietals.  

Second decision was to pre-stage the straps.  By looping them in the rope ladder ahead of time, all that remains is to slide the box through the strap and cinch it tight.  It requires estimating how much slack will be needed, but it frees up hands to do the balancing.

Unfortunately, there are not enough hands to provide an extra to hold on while performing the undertaking.  So you will have to balance carefully.

After you secure the straps to the rope ladder, you climb with the box.  Unfortunately, you are holding the box the wrong way, with the entrance away from the trap-out location.  But hopefully the bees will figure it out, since it would be nearly impossible to swap ends while you are up there.

You slide the box in.  This is the precarious moment, where you are in the greatest danger of overbalancing.  You carefully extend your arms, and, balancing the box on one hand, you extend your other, opening the hole for the box to fit into.  

Success.  There is a lot of slack, since you overestimated to avoid not having enough.  But that is OK.  You slide the near side into the loops, and you are home free.  Now it is just a matter of cinching it tight.

You begin to tighten the straps, a little from each side, and are very nearly done, when the box gives a sickening lurch.  

For a moment, you consider trying to save it. And then think better.  

And you watch in horror as the box, complete with eggs and brood from your other hive, slips out of both loops and drops thirty feet to the concrete below.

The box pops open.  Honey oozes from the broken mass of frames.  Broken bee larvae dropped out of the frame, and the box is a mess.  The frames themselves broke - the plastic ones shattered, the wooden ones broke in several places, and the empty ones are chipped and dinged pretty badly.

The whole thing is very discouraging.

On the other hand, by letting it fall, you avoided a terrible fate of your own.  And frames can be replaced.  

So you do - replace the frames, that is.  After trying to tape up the box, you decide to replace it entirely, and put new brood and frames in, reusing what you can, and climb up again.

But maybe you should try using bungee cords, instead.


Cone Trap - Brushy Mountain Bee Farms


So you have decided to buy a commercially produced product.  Great.  It is even inexpensive. $2!

But they charge $14 shipping.  For an item that is literally the size of a matchbox.


Undaunted by their exorbitant shipping costs?  I mean, you are going to spend money on screen wire, unless you cut it out of your neighbor's back door, right?

Bad news.  It also takes 10 days for them to process your order.  So you will sit for almost two weeks while you wait on your item to come.

Remember that urgency to getting the job done?  Yeah, well.  Forget about that.

So you need to do something else while you are waiting.  And you will have some nice cones for the next time.... if you can remember where you put them.

Did you want to try the nylon cone?  Click here

Did you want to attach an aluminum cone?  Click here

Did you want to do a hardware cloth cone?  Click here.

Or you can just wait for the store-bought cones.  Click here.

Bungees

So you decide to attach the box to the rope ladder with bungee cords.  Good idea.  Because you will have limited options when you are on top of the ladder, you wrap the bungee cords twice around the box, and then connect them to a carabiner, one on each side.

You start up the ladder, and realize that you have the box backwards.  The entrance is facing away from the hive entrance.  So you head back down the ladder, swap it end for end, and secure it tightly before beginning to climb again.

You haul the box up to the top of the ladder, and attach everything - very carefully - to the far side of the rope ladder, and then the near side of the rope ladder.  A few minor adjustments to get the box to hang vertically, and you are all set.

As you descend, you keep your fingers crossed, that the eggs and brood you left in the box will be attractive enough for the bees to come in, make a home, and start raising a queen.


....


A week later, and a few adjustments later, you are finally getting some bees in the box, but you are pretty sure that your eggs did not make it.  Eggs and young larvae need nurse bees to care for them, so they are not likely to have survived the heat without any care.

But when you check them, you are surprised to see that the brood has emerged.  They did not make any new queens, but there are new bees in the box that came from the brood cells.  And they are happily making honey in the box.

So you add two new frames of eggs and brood, and wait.  And hope.

And then....  click here.

Nylon Screen

Congratulations.  You just wasted 15 dollars more (you are only getting $200 for this, by the way).  The nylon does not hold up, flopping closed before you ever even apply the glue to it.  Worse, because you cut it to try it out, you can't even return it to Home Depot.  Would you like to try a different one?

Try aluminum screen.

Try 1/8" hardware cloth.

Or....

Give up and take the vacuum to them.


Cone Trap - Hardware Cloth

It makes sense.  If bees can get back into the cone the way that they got out of it, you need to change the cone.  The pokey entrance was not enough to dissuade (or you decided, like I did, to try the combination first) and you reinforce the cone with hardware cloth ($18 at the hardware store)

The concept: the outside cone gives the bees coming back in an entrance.  But at the base, they also have an exit, so they don't find the opening at the tip of the interior cone.

Note the total lack of bees
congregating around the entrance.
I am not sure how this is supposed to work.  Because it doesn't.  The bees go straight through the cone on the outside, and climb back in the cone on the inside.  The cone-within-a-cone serves no purpose.  Meanwhile, your box of bees, with a frame of brood, is getting no attention from the bees you are trying to trap.  So they are very actively NOT working to raise a new queen, because they already have a hive, and a queen, thank you very much.

So you have wasted a week.  You have wasted another can of expanding foam sealer ($7).  You have killed off all of the eggs in the frame you stole from the other hive. (What a waste.  Seriously.) 

So since the holes are too big, and there is no way to retro-fit it, you will start again.  Cutting away the whole mess, you pull apart the pieces you have used, keeping small cones and long cones and discarding the pieces of foam. (Meanwhile, the angel on your right shoulder begins to complain that you are letting pieces of foam fall without picking them up.  So you stop and do that...)

You look for something to use to ensure that your form gets held, and that can be attached to the wall.

OK.  Tea balls.  Why not?


You cut a hole in half of the tea strainer.  And you use it, attaching it to the side of the building.  The bees immediately start emerging, and they don't come back inside.  (Well, at least for a day).

When they do, you take the other cone, salvaged from the previous, and cement it into place using the last of your second can of expanding foam sealer.

Are you getting tired of this?  Yeah.  Well, let's see how your box is doing.

I forget.  Did you...

Attach the box using ratchet tie-down straps?  Click here.

or did you attach the box using bungee cords?  Click here.

A New Day

It is a bright, new day, and you have it all figured out.

Overnight, you worried the idea over and over.  And finally decided on a course of action.  You are going to swap out your ShopVac for the one your wife has.  Hers is more powerful, and won't lose suction so easily.  You have installed the bees from last night's efforts into a new box.  There is a bit of unhappiness with the bees there, and a lot of casualties involved in the effort, but without a nearby hive to migrate into, they are mostly staying in the box.

After sealing all except the entrance you want
to vacuum, the bees begin to congregate
And, again at dusk,  you return to the scene of the crime.

7' ladder, up.  New, more powerful ShopVac plugged in, and secured.  Clean mesh bag in the retrieval bucket, connected to the vac with a hose, and secured on the tall ladder.  Hose connected to the top of the bucket.

You climb the ladder, and give Lee a wave.  He fires up the vacuum.

And, suddenly remembering the importance of the headphones, you give him the signal and descend.

Removing the gear, you put the headphones on, and put the veil and the jacket back on, and climb the ladder again.  Vacuum on, the bees start to get sucked into the bucket.  It is working.  Powerful vac FTW!

And five minutes later, with the sun dropping further on the horizon, you begin to noticing decreased suction.  Again.  Testing the hose on the back of your glove you confirm that your new vacuum sucks, as well.

Aw, crapola.

As before, you descend with the bucket-o-bees, transfer them to the spare bucket, re-climb the ladder and start it up again, and the vacuum declines to pick up any more bees.  At this point you are:
  • High up an unstable ladder, with
  • Angry bees all around, with
  • A useless tool in your hand.
You are at a crossroads.  You are expected to complete the task in short order.  You want to get paid, but more than that, you want to complete the job. Which means, get the bees away from the people.  Into a new home is preferable, but if not, you are paid to remove the bees.

You have a choice.  You can:


Aluminum Screen

OK, you have decided to go with an aluminum screen cone.  Good call.  Aluminum screen is hardy, weather resistant, and a little bit pokey - so you can keep the bees from reentering.  So now you are off to the local hardware store to buy an $8 roll - the smallest available - of aluminum screen wire.  Pretty easy, and lots of replacement for when the first cone doesn't work.


You roll the cone as tight as possible, so that the bees can only get out one at a time from the tip of the cone.  You fray the edge, so that all the pokey edges are pointing outward, making it harder for bees to return. And you seal up all of the other holes with expanding foam sealer, so that the bees have to go through the cone to emerge.  The expanding foam sealer is goopy and sloppy, but after about ten minutes on the ladder (surrounded by very anxious bees), you can let go of the cone and it stays where it is.  A little bit extra foam around the base to ensure that all of the holes are sealed up, and you are good to go.

Now it is time to place your trap box.

Your concept: Take a small box, of a shape and size that will be attractive to a swarm of newly homeless bees, and give them a place to live.  Put frames in there, so that they can build comb, store nectar and pollen, and arrange living space.  And perhaps most importantly, steal a frame of brood with eggs and ready-to-emerge bees, from another hive, and put it in.

The bees will take one of the eggs, perhaps more, and turn them into queens.  At least, that is the theory.  And then you hang your box.

This is not a simple task.  You can't drill into the side of the building - it is historic brick.  Besides being hard to do, it is also a structure of cultural significance, and randomly drilling holes is frowned upon.

So you come up with two solutions: a) you can tie the box off to an anchor of some sort (you decide on a window weight from an old fashioned window - $5 at the antique store) or b) you can buy an escape ladder ($35 from your hardware store), and attach the box to it. (You decided on the escape ladder.)

You are using the cardboard box you got when you bought your bees, and there are three of them, so you are good on that front.  Now it is just a matter of anchoring it to the hanging ladder.  Do you:

Attach it using tie-down straps?  Click here,

or,

Attach it using bungee cords? Click here.


Keep Working - Night-Time Edition

You really aren't too bright, are you?

Bees stung you through the suit, you flailed in response, dropping the vacuum and falling off the ladder.  As you fell, you dislodged the bucket with the bees, which fell on top of you.

Your screams could be heard for miles.

Lee Robinson, who advised you not to continue, tried to catch you, but missed.  And once the bees broke loose, he ran for his life.  And then called 9-1-1 for you from a safe distance.

The emergency personnel tried to help you, but could not get past the bees.  They called a beekeeper from a nearby town to help, but by the time he arrived, you were already past saving.  Better luck next time....


Maybe the most awesome image ever. 
I need Windi Sebren to make me one. Stolen from this page.
Fortunately, Dead Beekeepers is a great name for a garage band....


(This is the only one of the blog entries in this series that does not reflect reality.  After all, Lee didn't really run away....)

Wanna try again?  Click here.

Back to the Drawing Board


Sometimes, it is best to just take a beat, and read, and think, and plan a little more.  Sure, there is a time for action, but sometimes, you gain insight by putting the chutzpah on hold and plotting things through a little better.

The books talk a lot about trap-outs, and how they work.  Essentially, you take a length of screen wire and make a cone out of it, creating a one-way door for the bees.  The bees come out of the wall, but they can't get back in. To help encourage them to find their place in a new home, you place a box right next to the cone, and they magically adopt that box as their home.

That is what the books say.  The details of how you do it are a little indistinct.  So you go to the internet, the source of all knowledge. Magically, like Rule 37, if it exists, you can buy it.  A site called Brushy Mountain Bees sells a cone for you.  Already made.  And they are cheap, selling for $2 each.

And then you add in the 14 dollars for shipping.

Never mind.  You decide to make it yourself.

A few more hours of clickbait internet surfing later, (Kylie Minogue meets with a Belgium prince, and you'll never believe what happens next!) you have done all the damage you can do.  The cone, you discover, has to be set over the entrance, and has to be the size of a bee at the end.  You can also make a double cone, if your bees find the way back in to your first cone. (With an escape hatch at the bottom so that the bees will enter, climb down, and exit, never finding the interior cone.

Do you (click one):

Make a cone out of fiberglass screen,

or,

Make a cone out of aluminum screen,

or,

Make a cone out of 1/8" hardware cloth

or,

Bite the shipping bullet and buy the cone from Brushy Mountain Bee

Thursday, June 14, 2018

Don't Look - Long Way Down

I extended my 20' ladder to its full length, and placed it against the front wall of Mr. Stephen Edmonson's house.  I clambered up, I stood on the top available rung, and still fell about four feet short of being able to peer into the hive.

This beehive removal was going to be tricky.

Stephen has a lovely house over in Ridgeland, about a 45 minute drive from my house, and he has bees that have infested the corner of the house. As he explained it,
Last year, we had a huge swarm of bees out in the tree right there in the front yard last year, and they just stayed there for a long time - it was just amazing.  Eventually, they moved into that spot right there. Then a couple of months ago, the AC guy got stung a couple of times in my attic, and there are a lot of dead bees up there.  So I contacted another beekeeper, who just got too busy.... and then I called you.

From the top of the ladder, I was at a better vantage point, but it was also very clear that my ladder was not going to cut it.  It was also clear that there was NOTHING to hang onto. But the bees were industriously running in and out of the hive, bringing in their groceries and doing their bit to pollinate the world.

I came back and told Stephen, "I will need to get a better ladder, but I can do it.  I will need somebody to help with this one, just because it is high, though.  But we should be able to get it out of there with little problem.  I'll send you an estimate, and we'll schedule the work."

Armed with a sturdy rental ladder from Home Depot, I returned this past Saturday to take on the job, with a friend and beekeeper Shannen Blackledge.  Even with the taller ladder, though, the drop from the top was formidable.  My auditorium job (blog post still pending) was probably higher, but at least there were some branches to hang onto while I worked. Not so here...

Every removal job I have done has been an exercise in problem solving.  How do I get to the bees, how do I open the hole enough to get them out; how do I remove them safely (both safety for me and safety for them) and how do I keep them from returning?

Finally started, I removed the molding on the face of the hive, and pried up the roofing just enough to see the extent of the comb.  And it was beautiful.  Layer after layer of beautiful, amber-colored comb. And curious bees looking back at me, without aggression or anger, just checking me out, then going back to clean up the mess I had already started to make.

That mess was about to get a whole lot worse.

Peeking inside.
I removed the shingles from the overhang (overbalancing once for a frightening moment).  And then tried to pry loose the waferboard (OSB) underneath.  The OSB extended under and through, and was tied into place from multiple directions.  After a half hour of trying to untie the Gordian knot, I got out the Sawzall, and cut through the OSB that capped the area. The comb was attached to the waferboard; removing it broke the very top of the comb off, and the delicious smell of honey permeated everything.  And the honey started to drip.

Honeycomb attached to waferboard
It dripped onto the ladder.  It dripped onto the light fixture.  I dripped onto the tarp (placed on the patio in an odd moment of foresight on my part) and onto me.  I invited Shannen to take a look from my perch on top of the ladder.  After a brief glance, her nice, clean suit was no longer either.

Then I started removing comb.  The first piece is almost always the toughest, as you have to try and remove the comb from the top, bottom, and sides, all without destroying the comb or spilling a drop of honey or pinching a bee or overbalancing.

...revealed more beneath.
This time, I successfully used a combination of bbq tongs and a long, thin jabsaw that let me cut the pieces free by sliding between the pieces of comb. What surprised me was how far back I could feel the comb.  The open space between combs extended more than 3 feet back... well beyond where I should have encountered the brick of the wall.  Oh, man, I thought.  This is going to be a MUCH bigger job than I thought.

A few more pieces of comb removed, and it was clear what had happened.  Instead of brick, there was foil-backed styrofoam board, covering an opening in the wall.  The bees had chewed through the styrofoam, and the ladies had built two combs and filled one with honey.

This was how the girls were getting into the attic. This was how the AC guy got stung.

Meanwhile, I am frantically looking for the queen.  My previous removals have not resulted in complete success, because I did not find the queen, and separate her out.  In one removal, she escaped and hid, only to return to the scene and instruct her followers to build more comb.  In another, I feel sure she got smushed by the vacuum (I have since lowered the amount of suction I use).  None has resulted in a queen that is viable.

So this time, I am on the lookout.  I extract a bee with an enormous abdomen, and am thrilled.  I have found the queen! Then I find another.  And another.

Apparently, this whole race of bees has huge distended abdomens.  And because they are coated in honey, it is hard to tell.  (Eventually, I captured her.  I think).

Finally, after dozens of trips up and down the ladder, each time carrying more brood and honey and comb down from the perch, and each time smearing more honey onto each rung of the ladder, I had hit the end of what I could reach.

There were still eight pieces of comb that needed to be removed.  And I had no real way to get to them.  The remainder were bracketed by multiple 2x4s, and closed in - completely inaccessible.  I reached in to cut the next one free, but every time I would reach to retrieve it, I would only manage to push it further away.

By this time, I had worked the site from 9:30 to mid afternoon, and I was getting tired and a little more accident prone.  I had managed to stave off a couple of slips (note to self: buy shoes with better traction) and a sickening slide of the ladder against the now-slick brick of the building (note to self: buy a ladder stabilizer) and a scary moment with the Sawzall (note to self:....um.)

Honeycomb's big, yeah, yeah, yeah...
I worked out the only solution I could come up with.  One more board was removed from the front - a small section of 2x4 that ran along the face of the opening.  Once I removed that piece, I had access to the remainder of the comb, which was very fresh, bright, new comb with pure honey inside.

All of the family - Stephen, his wife, and his four beautiful kids - all got in on the action at different points in the day.  For them, and for the passersby that stopped to ask us questions, we carved out and shared honey.

Then took the rest back with us.  (Where it now sits, in mason jars, ready for consumption....).  And finally, the removal of the comb was complete.

All (all!) that remained at this point was removal of the bees, cleaning the empty space, and relocating the bees to a new home.

It had already been a long day at this point, and it was not getting any shorter.  Shannen put another bottle of water in my hand - she had been carefully monitoring me for dehydration all day long, and fed me bottle after bottle of water.  A true life saver.

I attached my beevac to the shorter ladder and climbed up three more times to remove as many bees as I could reach.  Many would come back from the field later that evening and next day, but I managed to fill three buckets with bees, each getting set aside for placement once we got the comb moved to a new location.

I doused the entire opening with ammonia, which got the bees excited, but did not induce them to leave.  Finally, once the majority of the sticky mess had been turned into an ammonia-y mess, And most of the bees were gone, I added the poison to keep them from coming back and reoccupying the DMZ.


The final step was to get the bees installed in a new home.  I considered all my options.  The ones I favored all involved 3Bs - beer, benadryl, and bed, and leaving the bees for the next day.  But to give them the best chance at survival, I needed to get them into a new home as soon as possible.

I finally decided that I would drop them into a top-bar hive on Eddie Brook's property.  Two different removals have ended up on Eddie's doorstep, and one of the hives had completely absconded, so there was space.

I cut comb, wrapped rubber bands around the comb, and strapped the pieces on a top bar, fitting them into the box.  Then I suited up, and dumped all three buckets of bees into their new home, wishing them luck and leaving them behind. So that I could head to a place where three different Bs awaited my attention.

Reports from the field:

From Mr. Edmonson, following the removal:  On Sunday there was a huge swarm of them all around our house. Hundreds where you removed the hive. We almost couldn't go outside, they were attacking us in the front and back yard. We left after lunch on Sunday and just got back this afternoon. I looked up at the hive area, and I could see no more than 3 bees buzzing around and a lot of dead ones on the ground. So you must have gotten the queen.

And from Eddie Brooks:  There are LOTS of bees buzzing and happy around the new hive.  They look good.

Some Lessons Learned:

  • Ladder stabilizers are a must for high jobs.
  • Bring the top bar hive with you so you can tie off comb as you remove it.
  • More tupperware will always be needed.
  • Benadryl tablets might not be a bad thing to bring along. 
  • Hornet spray splatters back on you (and burns!) at close range.
  • Granola bars are a requirement.  A full meal in the middle of the day would be bad, but hunger at the end of the day is bad, too.
End result, I think this will be a success.  The bees are now no longer in the house, and a carpenter can come and do the repair work without fear of being stung.  And the bees have a new home that they can live in, with attention and care being paid to their well being.

Can't wait to see them building more comb.


Friday, May 18, 2018

Removals (x2)

"I am reading through this contract, and the way I read it, you will not replace the work that you tear out.  Am I reading that right?"

It is a fair question.  A fair thing to ask.  Mr. Victor Robinson has a tenant who was looking to have bees removed from his back porch, and I had gone over for an inspection and had discovered two separate hives - one on each level of the condo.  I had modified the contract accordingly and emailed it to him.

"Sir, I am a bee removal specialist," I explained.  "I am not a specialist in construction.  To be perfectly honest, as much as I don't want to be your carpenter, the truth is, you do not want me to be your construction specialist.  Jack-leg does not even begin to cover it."

"When Mr. Ervin did it last year, he replaced the boards and closed it up."

Sid Ervin is a legend hereabouts, and with good reason.  He did amazing work all across the state, opening up buildings with an absolute minimum of fuss, removed the bees that he could, poisoning the bees that remained, sealing up the hole, and leaving.  He earned his money; he was good at the work, and there was quite a demand.

But I had just finished a job where I drilled into plaster, and was (am) still working on a job that involved brick.  Recent experience has already shown me my limitations in a painful way.  It was a critical moment for a critical question. "If it is as simple as tacking a board back in place, I will do that.  But anything beyond that is beyond my carpentry skills."

We agreed, and I received the contract by email later that day.  And Monday, I gathered all of the items that I thought I would need and drove an hour over to Brandon Mississippi, to remove bees.

According to Charles Smith (I had a moment of panic when I was told that his name was Charles Smith, since that was also the name of my LAST job - I worried that I had gotten the name wrong on my first ever invoice....), the bees had appeared a little over a week earlier, and just completely covered the porch.  It was a very large swarm, and within a day, they had disappeared.  Into the column.

With a week's growth, I figured it was a good time to do the removal.  The bees would have had little time to build the comb, and it would not be terribly messy with only limited brood and comb.

I was wrong.  Very wrong.  Holy honeypot, the amount of work bees can do in a week when they are motivated is astounding.

Pure uncapped honey from the first step of opening the hive.
The only time I had watched bees begin to build a hive was at my house from the swarm collected from Drummond St., between the house of Launo Moore and Jill and Tony Bishop.  So I though I knew how fast the girls would build comb.

These girls swarmed just as the flowers were blooming, and there were resources.  It was also a much larger swarm, and they got busy.

I opened the top of the column, and immediately had honey to collect.  I went inside and snagged a small tupperware piece from the kitchen counter, salvaged some of the honey, and covered it for sharing.  With people, not with bees.  They can fend for themselves.

Opening the column.
Kathe had sent me on my previous removal mission with a set of barbecue tongs, and I found them enormously helpful in holding the comb in place with a minimum of damage.  My previous experience at the house in Vicksburg left me a little scarred on how much damage I had done to the brood comb, and I did not want to repeat the mistakes.  I was pleased with how they worked.  I might even use the tongs/spatula combo I have in the drawer for future removals.

The comb came out cleanly, with a minimum of fuss.  The latex gloves I wore kept tearing, and were discarded quickly, but all in all they served well.  Stings were lifted off the skin, and swelling fingers kept to a minimum (my ring mentioned in a previous entry still has not been repaired.)

Ollie, ollie, oxen free!
But I got the comb.  And the bees.  They were not happy about the situation, but that is not an expected outcome anyway.  Once I had removed the majority of the bees, I opened the side of the (square) column, and removed the rest, while providing remaining bees a chance to congregate at the central location.  I did not find the queen, but played an intense game of hide-and-seek for several hours, trying to figure out which section of the hive she was under, which board she was hiding behind, or what disguise she was wearing (I'm just a normal bee, nothing but a worker bee.....).  She also (quite cleverly) dressed up 8,000 of her closest relatives to look just like her.


Come out, come out, wherever you are...
And, yes, I am still tinkering with the vacuum.  The draw is too strong, and many of the bees are damaged in the process, so I am trying to use the beevac as infrequently as possible.

But the job is to remove the bees, so when I have removed as many as I can by other methods (singing to them, playing the fife, etc), I am pretty much left to remove them by sucking them into the vortex.  By far my greatest draw is to put comb into the bucket, and let them move to protect the comb.

Light, delicious honeycomb.
The comb was almost preternaturally bright.  This was not old comb - Charles was right that they were newly occupying the space - the comb was less than two weeks old.  And already they were drawing honey - light, sweet honey.

Once I had cleared the space up top, I moved to the lower level, where I removed the fascia board to reveal....

...more wood.

A bit anticlimactic.  I had hoped to hear the roar of unhappy bees, preparing to do battle.  Instead, I heard the thrum of bees going about their business: dehydrating nectar, stashing pollen, caring for brood.  From behind another layer of 2x6 #2 spruce.

After poking and prodding for a bit to see what could be removed, I finally succeeded in removing a horizontal piece, revealing bees back and to the side.  A very defensible position, the scout bees explained to me, as they offered to demonstrate the ways in which they were willing to make my life more difficult.

Piece by piece, standing 13' off the ground on an aluminum ladder, I removed pieces of the hive until all the new comb was gone.  Much like the other hive, these bees were a recent arrival.  Lots of new, fresh comb with both larvae and light honey ready to be capped with a wax cover, eggs, and bright pollen filling cell after cell.

After I had safely removed the comb (and, honestly, feeling a little proud about how well I was doing) I dropped back down to re-evaluate.

Not much of an opening.
Truthfully, being on a ladder, the phrase 'pride goeth before a fall' occurred to me more than once.  But everything up until this point had been pretty solid.

I grabbed the flashlight and looked into the hole.  To my surprise, an awful lot of bees looked back at me.  From very far back in the cavity.  I started reaching further back into the hole, making a bunch of bees very worried in the process, and I kept cutting comb.  But this was not bright, white, or even yellow comb.  This was old, dark comb.  There were no eggs, pollen or honey in any of these pieces.  These pieces of comb were left from last year's removal.  And maybe before that.

I was reaching to the maximum extent my arm could reach, deep into the hole.  And as much as I was extracting, there was more.  This hive had extended deep into the area between the ceiling and the floor.  And with every new patch of dark comb, more bees emerged.

I vacuumed again, and pulled out everything I could.  Finishing up with a wipe down of the entire surface with ammonia (and the burst of escapee-bees in hiding that always seems to accompany that action), I then went to finish the job.


And be a carpenter.  How hard can it be?  I am not terribly handy, but surely I can put things back into the place I took them out of, and tack them back into place.

Of course, nothing fit back into the original space.  I used a crowbar to force the column pieces back into place.  I tacked, and caulked, and sprayed with a vile insecticide expanding foam sealer that I am still finding attached to my skin and my clothes in the most inexplicable places.

And after an hour of work, I had the column put back together.

A quick vacuum of the stray bees, and I went to work on the fascia for the lower hive.

Again, nothing fit.  Nothing.  Finally managed to cinch the horizontal piece back in place, together with the replacement duct tape and screen wire to secure the holes.  And again, I caulked and sprayed foam to seal holes.  As the foam would dry, I would run the vacuum again, to get more of the stray bees away.

Finally, after about ten hours of work on the ladder, I gave it up.  I could not put the fascia board back in place, but I swept up the debris and explained the next steps to the tenant (and later in an email to the owner).  After a week:

  • Trim the foam.  
  • Replace the fascia board.  
  • Caulk and paint to reduce the risk of return.

I shared the honey, and left.


All in all, not bad.  I took the bees and comb by a friend who keeps bees, and set him up with two potential hives, all ready for him to raise.  And made it home in time for a laaate dinner that Kathe had prepared.

About a dozen stings, including a surprise one on the belly at the end of the day.  But being able to complete the job, and share both bees and honey....

It feels good.

On to the next job.