 |
| Bee-tween the window and the drapes. |
I love bees. Bees are a delightful part of nature.
But.
Nature, I am told, is intended to remain outside the walls of our homes. To establish our safe haven within a location of our choosing, we beat back the weeds and the animals and the insects, and we sanitize and create our space to our own desires.
Our space.
Very rarely are bees expected to be part of that space. And certainly, any situation where bees have unfettered access to that space is to be avoided.
Last week I got a message.
Facebook message from Mr. Smith's sister, Portia
|
Bees. Inside.
As my sister said, "Nope."
The house is beautiful. It is made to look like the limestone that faces the buildings at the front of the Tulane campus, and has a lovely feature (tower? keep? machicolations? I don't know.) on the southeast side of the house. When the owners got in touch with me, they referred to the house as The Castle House. Originally from Vicksburg, they had purchased the house as a family home, eventually to be passed on to their granddaughter.
And there are bees inside the house.
Nope.
So my job was to remove the bees from a beautiful, turn-of-the-century home. My goal was to remove them safely, get the queen ensconced in a new hive, and bring enough of her loyal subjects and resources to get the hive started in a new place where they could thrive.
My job has been done. The bees are no longer in the house.
 |
| Bees entering from the base of the window. |
I did NOT, however, reach my goal.
The whole job was a learning experience, and there were a host of unknowns from the start. How far down did the bees go? How far up? Which studs defined the limits of their space? How were they getting into the house?
The first piece that provided a difficulty was the shape of the room. Yes, the room the bees decided to inhabit was a circular room. The plaster work for the room was done at a time - back in the early 1900s - when work in plaster was a common craft.
Nowadays, to find a good plaster guy, you will pay big.
 |
| My first schematic. The bee bag got drawn into the hose at the bottom, clogging it. |
I promised Mr. Smith that I would cut as little as possible to remove the bees. My first step was to drill a hole in the wall, allowing the bees a specific place to escape. I would use my beevac to suck them up.
Now Best Beloved, my beevac needed some tinkering. On a different job, the suction completely disappeared, while I was up on a 30' ladder. Situation: less than ideal. So with the help of my inventor-brother Parker, I modified the design so that I could draw the bees through the hose and into the bucket/bag combination.
Parker's suggestion was to add a tube at the bottom, and perforate it, so that there were more than one place for the vacuum to draw. It was similar to the design I had originally used - before the introduction of the paint-strainer-as-bee-bag.
The draw, as a result of his suggestion, was vastly improved.
I drilled holes in the wall of the upstairs room in The Castle House, and the bees began to emerge. Because I was working inside, I could not use the smoke to calm them down - there is something about bedsheets and mattresses and smoke that don't mix.
So I beevacked. Slowly, the numbers of curious bees started to abate, and I cut the hole open wider. The opening ended up being about 18" high by 12" wide - enough to get my gloved hand in with the vacuum, but not much room for maneuvering.
And there were bees downstairs as well, which meant that it was possible that the hive extended below the floor and into the wall on the first floor - a big uncertainty that I needed to deal with eventually. But first, I had to start removing the comb.
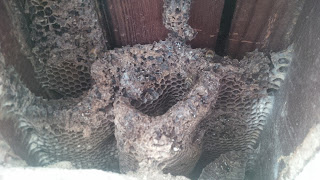
The first bit of comb I encountered was old, abandoned comb - the bees had gone lower in the wall since they had built that first piece. To get the comb out easily, I was going to have to expand.
Discussions with Mr. Smith did not get far. I wanted to cut through the base board precisely, to expose more of the comb so I could remove it carefully. I do understand his response ("No.") because replacing it would be tough, no matter how careful I was. I used to work for a company that manufactured molding. Curved molding is an expensive product.
 |
| Below the sill, above the baseboard, between the studs. |
I also floated the idea of opening the wall downstairs, if the hive extended that far. That was also met with a negative response. Again, understandable. The replacement of plaster on one opening in one room on the second floor is expensive, but doable. The downstairs room, though, is pretty much the centerpiece of the home. "Crorey, if the bees extend down that far, we will just have to fill them in; I can't open the wall downstairs."
I continued to remove comb. At first, all of the comb was empty, with no honey or brood or pollen. As I got lower, there was brood. And as carefully as I tried to extract it, I bruised all of the comb as it was coming out, damaging larvae and pupae as I did so.
Meanwhile, the vacuum continued to do its work.
At one point, I left the beevac running, with the hose in the wall, and went downstairs for a glass of water. When I returned, the hose had fallen out of the wall, and there were a large number of bees that had wandered up to investigate the new situation.
 |
| Veil up selfie. The way it should be. |
I ran over to the hole, and began vacuuming them up, and they reacted predictably.
Ow. OW. OWW!
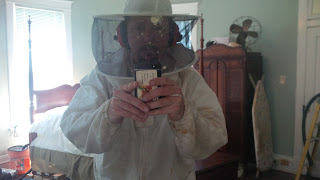
It was at this point that I decided to pull the veil back over over my head. Something I should have done BEFORE I approached the bees, but in my haste to prevent a bee jailbreak, I forgot. Nose, scalp, scalp. Not bad, considering, but a definite reminder to slow down and then react, rather than react first, and then think....
I continued to remove comb, encountering a nail in the wall that limited my access, and eventually encountering a floorboard that extended into the wall space, as well. Each piece of comb removed was preceded by multiple attempts to remove the bees into the beevac.
 |
| Old, disused comb. |
 |
| Another 18" of removed comb. Nail between wall and siding. |
 |
| Nail removed, more comb removed, revealing floor board obstruction. |
 |
| Comb. Sadly, I was not able to remove the brood comb intact. |
Beneath the floorboard was the best brood comb I encountered. Removing it required that I reach under the floorboard, grasp the comb, break it free, and then snake it out through the opening between the wall, stud, siding, and floorboard. All while wearing a glove to ensure that I got stung the fewest times possible.
Eventually I had to remove the glove, and dive into that space barehanded, to retrieve the comb.
The comb extended to the ceiling of the first floor, where I hit a hard surface. The rest of the afternoon was spent removing the fragments of comb from different crevices across the opening.
 |
| Closed up the hole, vacuumed up debris, and ready to go. |
Once all of the comb was removed, I wiped all the interior surfaces down with ammonia. Several bees who had hidden in different places in the hole suddenly erupted into the room, more than a little upset at having been gassed out of their game of hide-and-seek. After consigning them to the interior of the bee vac, I sealed the inside corner with foam sealer, closed up the hole, and vacuumed up the remaining plaster and wood, dead bees and comb from the room.
I then took the vacuumed bees home, and placed them in a hive box. I never saw the queen, and suspect that she was KIA. I remain very conflicted about removal that does not net the queen, because it means I still have a lot to learn.
I finalized the process by climbing up to seal the exterior with silicone. And the job was done.
The job was done. But the goal still remains. I want to do better. I want to improve the bee vac to make it gentler on the bees. I want to take my time and find the queen, so that I can complete the task and introduce the bees to a new home.
 |
| Mr. Smith wore my spare veil while I transferred bees from vac to bucket. |


No comments:
Post a Comment